Build Your First Mobile App With The Ionic Framework - Part 4
In this post I'll show you how to test your Ionic mobile app in the desktop browser, on emulators and on mobile devices.
==Update: This tutorial is for Ionic 1.x, you can find the Ionic 2 tutorial here.==
This post is part of a multi-part series:
Part 1 - Introduction to Hybrid Mobile Apps
Part 2 - Set Up your Development Environment
Part 3 - Mockup with Ionic Creator
Part 4 - Test on Browsers, Emulators and Mobile Devices (this post)
Part 5 - Build out the App
Part 6 - Deploy to Testers with Ionic View
###Test in the Desktop Browser During development it's a lot easier to test your app in the desktop browser than to test it on a mobile device. Debugging your code when it's running on a device or emulator is not fun, so you're better off using your browser's Developer Tools for that.
The Ionic CLI makes it super-easy to test in the browser. Make sure you're in your app's root folder, in our case: DinnerApp and fire up this command:
$ ionic serveThis will start an HTTP server to host the files in the www folder and launch your default browser to display it. This method also supports live-reload, so anytime you change anything in your code, the app will be automatically refreshed in the browser. The live-reload looks for changes in any files in your www folder (excluding the lib folder, but that's configurable).[1]
####Ionic Lab
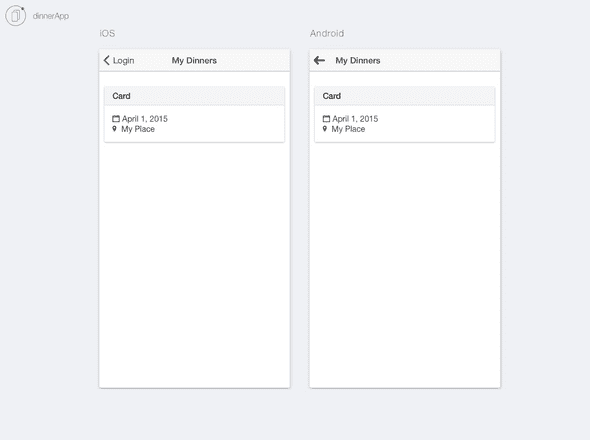
You can also use the ionic serve command to view the iOS and Android versions of your app next to each other in the browser. This is called Ionic Lab and it supports live-reload as well, how cool is that! :)
$ ionic serve --labLet's see what our app looks like in this mode. Navigate to the My Dinners views on both and you can see that the transitions are different, the text in the header is centered for iOS and in the Android version it's left-aligned. The back button is different as well. This is what makes the Ionic Framework so great to use, you don't have to implement these things yourself and you'll get a native look-and-feel to your app.
###Add iOS and Android Platforms
Before we have a look at testing in emulators and on real devices, let's add the iOS and Android platforms to the app:
$ ionic platform ios
$ ionic platform android
What this command does is it creates an ios and an android folder and these contain the actual XCode and Android projects for the app. These projects will eventually be built into the packages that will be deployed to the App Stores.
Before you can test the apps, you'll have to build them:
$ ionic build ios
$ ionic build android
###Test in an Emulator You should always test your app on real devices, because an emulator can't guarantee that your app will work the same way on a real device. However, emulators are very helpful when you want to see how your app would behave on other devices and other versions of the device's Operating System.
####iOS To launch the app in the iOS simulator, do the following:
$ ionic emulate ios####Android First start an emulator in Genymotion and then run:
$ ionic run androidAs you can see we're not using ionic emulate android here, which would fire up the default Android Emulator. The Genymotion Emulator is seen by the Ionic CLI as a real device, that's why we use $ ionic run android.
If you're getting this error: Error executing "adb devices": ADB server didn't ACK
- failed to start daemon *
Go to Settings in Genymotion and on the ADB tab select Use custom Android SDK tools and select the path where the Android SDK is installed.
###Test on a Mobile Device To test on a mobile device you'll have to connect it to the computer with a usb cable.
If you want to run your app on an iOS device you'll need an Apple iOS Developer Account ($99 per year) and set up your certificates in XCode. This is the same account you'll use to deploy your app to the App Store.[2]
For Android you're not required to get a developer account to run it on a device, but you'll need it when you want to publish to the Google Play store ($25 registration fee).[3]
Test on iOS device:
$ ionic run iosTest on Android device:
$ ionic run androidNext up: let's write the code for our app and test it with real data in Part 5.
####References [1] Ionic CLI Docs [2] Cordova iOS Platform Guide [3] Google Play Developer account
