How To Query Facebook Graph API In An Ionic 2+ App
In this post, we'll have a look at the Facebook Graph API and how to query it to get public posts from a Facebook Page without using any external plugins. For public posts you don't need a User Token to get access, you only need an App Token. I'll show you how to get that and then we'll build our Ionic 2 app!
###What are we going to build?
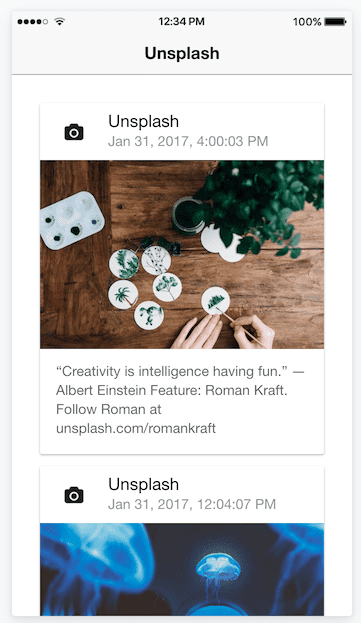
I love Unsplash, they have beautiful high-quality photos that are free to use. We'll make an app that takes the posts from their Facebook Page and displays the first photo of every post, just to make the app look pretty. :)
###Create the app Let's start by creating our Ionic 2 app. I'll assume your development environment is already set up for building Ionic 2 apps. If not, please have a look at this tutorial.
$ ionic start ionic2-tutorial-facebook blank --v2
$ cd ionic2-tutorial-facebook
###Get Your Facebook App Token Head on over to https://developers.facebook.com/apps and log in with your Facebook account.
Click on the Add a New App button and type in a name for the app, your contact email address and choose a category. When the app is created it will show up in the list of apps and when you click on it, you'll go to the Dashboard.
Click on the Tools & Support link in the upper right corner and then on the Access Token Tool link. Or go directly there by clicking this link.
Your app should be listed there and you should see an App Token assigned to it. We will use this token later on in our app to connect to the Graph API.
###Facebook Graph API Explorer Facebook Graph API is an HTTP-based service and the way you query it is different from a REST service in the sense that you specify in the request which data you want the server to return.
To find out which fields are available to query we'll use the Facebook Graph API Explorer.
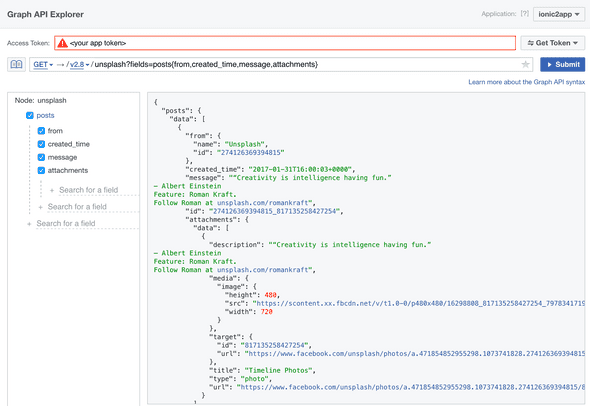
In the Graph API Explorer, select your application, mine is called ionic2app. Next, press on the Get Token button and select App Token. This will put your App Token in the input box, I've left mine out in the screenshot below.
In the query input box you can put in the name of the page you're going to query, so if you type in unsplash and hit Submit you'll get a JSON result with only the name and id of the page.
On the left side, you can then start searching for available fields that you want to include in your query. In the screenshot below, you can see which fields I selected and every time you select a field, it will automatically update the query for you.
So now we have a query that looks like this:
unsplash?fields=posts{from,created_time,message,attachments}
Let's hit the Submit button again and now we can actually see the posts from the page in JSON format.
To make date formatting for our app easier, we'll request all times in Unix timestamp format by appending this to the query: &date_format=U.
###Create the service So now that we know how to write our query, it's actually very easy to write a service to get the data.
We'll create a new service FacebookService with a getPosts function that takes the pageName and uses the Angular Http client to do the request and map the result to an array of posts.
// location: src/services/facebook.service.ts

import { Http } from '@angular/http';
import { Injectable } from '@angular/core';

import { Observable } from 'rxjs/Rx';
import 'rxjs/add/operator/map';

@Injectable()
export class FacebookService {

  private accessToken = '<your app token>';

  private graphUrl = 'https://graph.facebook.com/';
  private graphQuery = `?access_token=${this.accessToken}&date_format=U&fields=posts{from,created_time,message,attachments}`;

  constructor(private http: Http) { }

  getPosts(pageName: string): Observable<any[]> {
    let url = this.graphUrl + pageName + this.graphQuery;

    return this.http
        .get(url)
        .map(response => response.json().posts.data);
   }
}
Please note that your App Token should be kept secret because it can be used by anyone to do requests with it. Someone with malicious intent could easily decompile your app and find the App Token in your code.
A good way to keep this token secret is by implementing a backend service to handle the call to the Facebook Graph API so you don't have to know the token on the frontend.
###Create the view
Let's modify the existing HomePage component to use our new FacebookService to get the posts. I'm sending in 'unsplash' as the pageName for the Facebook Page.
// location: src/pages/home/home.ts

import { Component } from '@angular/core';
import { NavController } from 'ionic-angular';
import { FacebookService } from './../../services/facebook.service';

import { Observable } from 'rxjs/Rx';
import 'rxjs/add/operator/map';

@Component({
  selector: 'page-home',
  templateUrl: 'home.html',
  providers: [FacebookService]
})
export class HomePage {
  public posts: Observable<any[]>;

  constructor(public navCtrl: NavController,
              public facebookService: FacebookService) {

    this.posts = this.facebookService
      .getPosts('unsplash')
      .map(data => data.map(this.mapPosts));
  }
}
To keep our template simple, let's do some mapping to process the data we're going to display. We've requested a Unix timestamp format which is in seconds, but in the view, we'll use DatePipe to format it and that expects a value in milliseconds.
  mapPosts = (post) => {
    return {
      from: post.from,
      time: post.created_time * 1000, // convert to milliseconds
      message: post.message,
      photos: this.getPhotos(post)
    };
  }
Since we are only interested in displaying photos, let's filter the attachments on the post in the getPhotos function.
  getPhotos = (post) => {
    if (!post.attachments)
      return [];

    let attachments = post.attachments.data[0].subattachments ||
                      post.attachments;

    return attachments.data
      .filter(x => x.type == "photo")
      .map(x => x.media.image);
  }
Now we can build our view template, we'll use <ion-card> to display the posts. We'll get the avatar from Facebook on this URL: http://graph.facebook.com/{{post.fromId}}/picture.
We're only going to display posts that contain photos and we'll display one photo per post.
<!-- location: src/pages/home/home.html -->

<ion-header>
  <ion-navbar>
    <ion-title>
      Unsplash
    </ion-title>
  </ion-navbar>
</ion-header>
<ion-content padding>
  <ng-container *ngFor="let post of posts | async">
    <ion-card *ngIf="post.photos.length > 0">
      <ion-item>
        <ion-avatar item-left>
          <img src="http://graph.facebook.com/{{post.from.id}}/picture" />
        </ion-avatar>
        <h2>{{ post.from.name }}</h2>
        <p>{{ post.time | date:'medium' }}</p>
      </ion-item>
      <img [src]="post.photos[0].src" />
      <ion-card-content>
        <p>{{ post.message }}</p>
      </ion-card-content>
    </ion-card>
  </ng-container>
</ion-content>
And now we're done, test the app in the browser with the command below.
$ ionic serve --labThis is what your app should look like.
###What's Next? As you can see it was very easy to get and display public posts from Facebook without having to use any plugins.
However, for accessing other data or to publish to Facebook you'll need to send a User Token with your requests. You can use the Cordova Facebook Plugin to use the native Facebook app for signing the user in.
As I mentioned earlier, it's not such a good idea to leave your App Token in the code, since it can be stolen by anyone who decompiles your app. In my next post, I'll show you how to create a backend service that will do the call to Facebook for you.

