How To Build An Ionic App With A Graphcool Backend - Part 2
In this post, we'll have a look at how to set up a Graphcool project to serve as the backend for our Ionic app which is going to be a Shopping List app.
In the app, we'll have a view for displaying items and another for displaying categories. When a category is selected we'll display only the items in that category.
The GraphQL schema for this app will have 2 types: Item and Category with a relationship defined between them. Let's get started!
This tutorial is split up into these parts
Part 1 - Introduction to GraphQL, Graphcool, and Apollo Client
Part 2 - Creating a Graphcool backend (this post)
Part 3 - Querying data in an Ionic app
Part 4 - Mutations in an Ionic app
Part 5 - Real-time subscriptions in an Ionic app
Create Graphcool Project
We can create a Graphcool project and schema with the Graphcool CLI or with the Graphcool Console UI. For this tutorial, we'll use the UI.
Go to the Graphcool website and sign up for an account there.
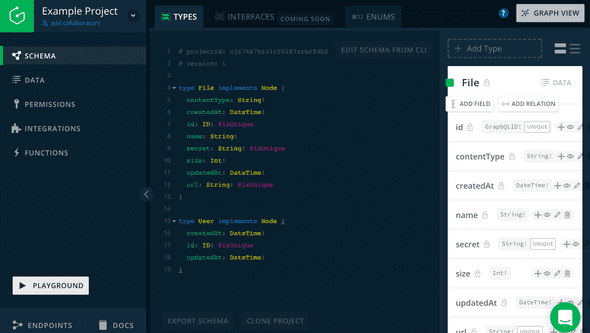
Once you're logged in you'll have access to the Console UI. An example project will already be created for you.
Let's create a new project. Select the down arrow next to the name of the example project (top left) and click on the + sign to add your project. I've named mine "Shopping List", but it doesn't really matter what you name it.
In the bottom left corner click on the ENDPOINTS button. You'll see different types of endpoints for your Graphcool backend. We will use the Simple endpoint and the Subscriptions endpoint when we build our Ionic app.
Define Schema
Initially, the schema will always have a User type for authentication and a File type for file management. We'll ignore these for now and add the following types for our application.
type Category {
  id: ID! @isUnique
  name: String!
}

type Item {
  id: ID! @isUnique
  name: String!
  quantity: Int
  done: Boolean
}
As you can see, we can specify the types of the fields. If the type is followed by an exclamation mark, it means that the field is required (non-nullable). For more information on which types you can use, check out the docs.
The id field is of type ID, is a unique 25-character string, and will be automatically generated when a new Item or Category is created.
Click on the Preview Changes button to validate the schema changes and then click Apply Changes.
As you can see the types have been changed to implement Node and 2 new fields are added automatically: createdAt and updatedAt.
type Category implements Node {
  id: ID! @isUnique
  name: String!
  createdAt: DateTime!
  updatedAt: DateTime!
}

type Item implements Node {
  id: ID! @isUnique
  name: String!
  quantity: Int
  done: Boolean
  createdAt: DateTime!
  updatedAt: DateTime!
}
Queries and Mutations
We can use the Playground to try querying and mutating data. Click on the Playground button in the bottom left corner.
The Playground editor helps us out with auto-complete based on the schema we've just created.
Let's try adding a Category. We'll use the createCategory mutation which was automatically generated when we created the type Category.
mutation {
  createCategory(name: "Groceries") {
    id
  }
}
This mutation adds a new Category with the name "Groceries". With any mutation, we can specify which fields we want to send back as return values. In this case, we're returning the generated id for the new Category.
Click on the big play button in the middle and you should get an output similar to the one below.
{
  "data": {
    "createCategory": {
      "id": "cj7rfcdr0httm0150znr2ykg4"
    }
  }
}
Now click on Data in the left menu and you can see your Category is now added. You can modify data here as well.
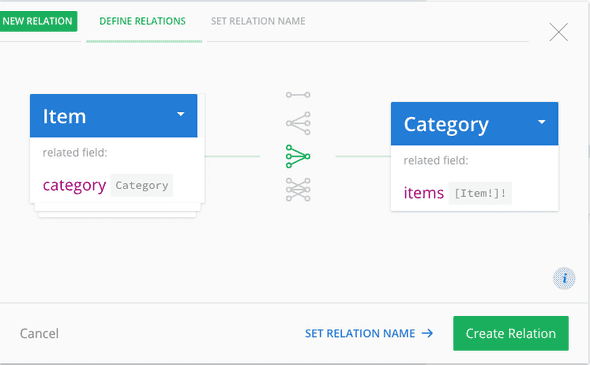
Let's define the relationship between Category and Item. A Category can have 0 or more Items and an Item can optionally have one Category related to it.
We can type in the relationship in the editor, or we can use the UI to create it for us by using the ADD RELATION button.
Click on Create Relation to create the relationship in the schema. It should now look like this:
type Category implements Node {
  id: ID! @isUnique
  name: String!
  createdAt: DateTime!
  items: [Item!]! @relation(name: "ItemOnCategory")
  updatedAt: DateTime!
}

type Item implements Node {
  id: ID! @isUnique
  name: String!
  quantity: Int
  done: Boolean
  category: Category @relation(name: "ItemOnCategory")
  createdAt: DateTime!
  updatedAt: DateTime!
}
Now let's switch to the Playground again and add an Item to the Category we created before. We'll use the generated createItem mutation now. We can link the Item to the Category by sending the categoryId.
mutation {
  createItem(
    name: "Banana"
    quantity: 2
    categoryId: "cj7rfcdr0httm0150znr2ykg4"
  ) {
    id
  }
}
You can check the Data view to see that the Item has been created, but let's write a query to get this data in JSON format the way a client app would request it.
I explained in the first part of this tutorial that a GraphQL query can specify exactly which data it wants from the backend.
Let's say we want to get all Items and we're only interested in the Item name and quantity and Category name. As with the mutations, we also have automatically generated queries for our types.
In this case, we're using the allItems query which returns, you guessed it, all Items.
query {
  allItems {
    name
    quantity
    category {
      name
    }
  }
}
When you run this query in the Playground you should get all the items with the requested fields. I've added a couple more Items on my backend to show you a result with different Items.
{
  "data": {
    "allItems": [
      {
        "name": "Banana",
        "quantity": 2,
        "category": {
          "name": "Groceries"
        }
      },
      {
        "name": "Apple",
        "quantity": null,
        "category": {
          "name": "Groceries"
        }
      },
      {
        "name": "Parrot",
        "quantity": null,
        "category": null
      },
      {
        "name": "iPhone X",
        "quantity": null,
        "category": {
          "name": "Expensive Stuff"
        }
      }
    ]
  }
}
In this case, the data model is very simple, but you can imagine that, with a more complex data model, these queries can allow you to fetch data efficiently with just one request.
You can also order, filter and specify pagination arguments in your queries.
####Customizing Queries and Mutations The queries and mutations we've used are all automatically generated, but you can also create your own custom queries and mutations. I'm not going to cover that in this tutorial but you can read all about it in the API documentation.
###What's next? We're done with the backend for now. We've set up our schema, we know how to write queries and mutations and we have the endpoint to send our queries to.
In the next part, we'll build the views for our Ionic app and use Apollo Client to connect to the Graphcool backend.

