How To Use PouchDB + SQLite For Local Storage In Your Ionic App
I was recently looking into local storage options for an Ionic app. From what I could find, the most popular choice is to use a SQLite database.
However, I kept running into people mentioning PouchDB to store data locally and sync it with a server, but I didn't need a server for this particular app. PouchDB also uses a NoSQL approach to database storage, and I come from a SQL background, so I figured I should just go with SQLite.
After reading a bit more, I realized that development would be a lot faster and easier with PouchDB, even if you only use it for local storage.
==Update: This tutorial is for Ionic 1.x, you can find the Ionic 2 tutorial here.==
==Update: Instead of PouchDB you can also use LokiJS, a fast in-memory database. Read my tutorial for LokiJS.==
###What is PouchDB? PouchDB is an open-source JavaScript library that uses IndexedDB or WebSQL to store data in the browser. It's inspired by Apache CouchDB and allows you to sync your local data with a CouchDB server.
There are storage limits for IndexedDB/WebSQL databases, so you're better off using SQLite for unlimited storage on a mobile device. PouchDB will automatically use SQLite if you have installed the Cordova plugin for it.
Another important benefit of using SQLite as the database, is that it's supposed to perform better than IndexedDB/WebSQL. I haven't personally tested the performance, so I can't guarantee that.
==Update: SQLite is actually slower than IndexedDB/WebSQL as mentioned in the comment by Nolan Lawson below.==
###Set up the libraries We'll have to install a couple of libraries into our app to get PouchDB working with SQLite.
- SQLite plugin for Cordova
- PouchDB library
To install the SQLite plugin execute the following command in your Ionic app directory:
$ cordova plugin add io.litehelpers.cordova.sqlitestorageI used Bower to install PouchDB, but you can use whichever method you want.
$ bower install pouchdbNext, let's reference the PouchDB library in index.html.
<script src="lib/pouchdb/dist/pouchdb.min.js"></script>We are done with setting up the necessary libraries, you now have everything you need to start writing code!
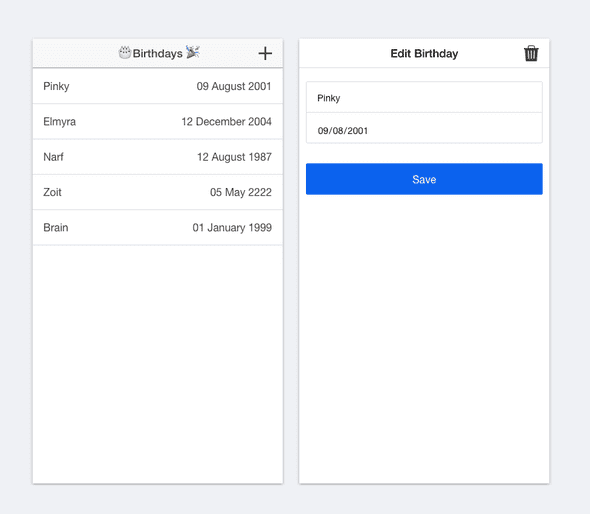
###What are we going to build? Our app is going to be a birthday registration app that will have add, update, delete and read functionality.
###Create database service Let's go ahead and create a service with Angular to encapsulate our PouchDB calls.
angular.module('starter').factory('BirthdayService', ['$q', BirthdayService]);

function BirthdayService($q) {
	var _db;

	// We'll need this later.
	var _birthdays;

	return {
		initDB: initDB,

		// We'll add these later.
        getAllBirthdays: getAllBirthdays,
        addBirthday: addBirthday,
        updateBirthday: updateBirthday,
        deleteBirthday: deleteBirthday
	};

	function initDB() {
		// Creates the database or opens if it already exists
		_db = new PouchDB('birthdays', {adapter: 'websql'});
	};
}
As you can see we're injecting $q which we'll need later in this post.
The initDB function creates the database if it doesn't exist yet. If it already exists it opens it.
####Add a birthday Let's write the code for adding a birthday to our database.
==Update: updated code to use $q.when instead of $q.defer==
function addBirthday(birthday) {
  	return $q.when(_db.post(birthday));
};
Is that all? Yes, that is all you have to do!
We don't need to write a SQL INSERT statement and map the data to a SQL table. In PouchDB the birthday object is simply serialized into JSON and stored in the database.
There are 2 ways to insert data, the post method and the put method. The difference is that if you add something with the post method, PouchDB will generate an _id for you, whereas if you use the put method you're generating the _id yourself.
You might be a bit curious as to why we have to wrap the call to _db.post in a $q promise. I'll explain that a bit later, so keep reading!
####Update a birthday
function updateBirthday(birthday) {
    return $q.when(_db.put(birthday));
};
####Delete a birthday
function deleteBirthday(birthday) {
    return $q.when(_db.remove(birthday));
};
####Get all birthdays Let's get all the birthdays saved in the database.
function getAllBirthdays() {
	if (!_birthdays) {
       return $q.when(_db.allDocs({ include_docs: true}))
			.then(function(docs) {

				// Each row has a .doc object and we just want to send an
				// array of birthday objects back to the calling controller,
				// so let's map the array to contain just the .doc objects.
				_birthdays = docs.rows.map(function(row) {
					// Dates are not automatically converted from a string.
					row.doc.Date = new Date(row.doc.Date);
					return row.doc;
				});

				// Listen for changes on the database.
				_db.changes({ live: true, since: 'now', include_docs: true})
				   .on('change', onDatabaseChange);

				return _birthdays;
			});
	} else {
		// Return cached data as a promise
		return $q.when(_birthdays);
	}
};
We use the allDocs function to get an array back of all the birthday objects in the database. I don't want the controller that will be calling this service to know anything about docs or PouchDB, so I've mapped the rows array to a new array that only contains the row.doc objects.
As you can see there is also a conversion of the row.doc.Date property to an actual Date, because unfortunately, the dates in JSON will not be automatically converted back to Date objects.
I also save the output in the _birthdays array so the data will be cached and I will only have to get the data from the database one time on start of the app.
"But...", you ask, "how will I keep that cached data in sync with the database when there is data added or changed?"
Well, I'm glad you asked, that's where the onDatabaseChange function comes in.
function onDatabaseChange(change) {
    var index = findIndex(_birthdays, change.id);
    var birthday = _birthdays[index];

    if (change.deleted) {
        if (birthday) {
            _birthdays.splice(index, 1); // delete
        }
    } else {
        if (birthday && birthday._id === change.id) {
        	_birthdays[index] = change.doc; // update
        } else {
        	_birthdays.splice(index, 0, change.doc) // insert
        }
    }
}

// Binary search, the array is by default sorted by _id.
function findIndex(array, id) {
	var low = 0, high = array.length, mid;
	while (low < high) {
	mid = (low + high) >>> 1;
	array[mid]._id < id ? low = mid + 1 : high = mid
	}
	return low;
}
This function allows you to update the _birthdays array whenever there is a change on your database. The input for this method is a change object that contains an id and the actual data in a doc object. If this id is not found in the _birthdays array it means that it is a new birthday and we will add it to the array, otherwise it's either an update or a delete and we make our changes to the array accordingly.
####What about $q?
Remember how we wrapped our database calls in $q promises?
All database functions in PouchDB are asynchronous and already use promises, yay!!! Unfortunately, when the promises are resolved, Angular doesn't know that it needs to update the UI. However, when you wrap these calls with $q, it does it's magic and let's Angular know that it needs update the UI.
There is an AngularJS wrapper for PouchDB library that does just that for you. I tried using that at first and it was working, but when I tried to access the database in the console I was getting errors and it also didn't work with the PouchDB Inspector, which I'll show you later.
###Let's build the UI OK, so we have the service set up which does most of the heavy work, let's have a look at the UI.
We'll add an OverviewController, this calls the birthdayService.initDB function, but we have to wait for the $ionicPlatform.ready event to make sure the device is ready.
angular.module('starter').controller('OverviewController', ['$scope', '$ionicModal', '$ionicPlatform', 'BirthdayService', OverviewController]);

function OverviewController($scope, $ionicModal, $ionicPlatform, birthdayService) {
	var vm = this;

	// Initialize the database.
	$ionicPlatform.ready(function() {
		birthdayService.initDB();

		// Get all birthday records from the database.
		birthdayService.getAllBirthdays().then(function(birthdays) {
			vm.birthdays = birthdays;
		});
	});

	// Initialize the modal view.
	$ionicModal.fromTemplateUrl('add-or-edit-birthday.html', {
		scope: $scope,
		animation: 'slide-in-up'
	}).then(function(modal) {
		$scope.modal = modal;
	});

	vm.showAddBirthdayModal = function() {
		$scope.birthday = {};
		$scope.action = 'Add';
		$scope.isAdd = true;
		$scope.modal.show();
	};

	vm.showEditBirthdayModal = function(birthday) {
		$scope.birthday = birthday;
		$scope.action = 'Edit';
		$scope.isAdd = false;
		$scope.modal.show();
	};

	$scope.saveBirthday = function() {
		if ($scope.isAdd) {
			birthdayService.addBirthday($scope.birthday);
		} else {
			birthdayService.updateBirthday($scope.birthday);
		}
		$scope.modal.hide();
	};

	$scope.deleteBirthday = function() {
		birthdayService.deleteBirthday($scope.birthday);
		$scope.modal.hide();
	};

	$scope.$on('$destroy', function() {
		$scope.modal.remove();
	});

	return vm;
}
And this is the code in index.html, we're using a modal dialog to display the Add Birthday and Edit Birthday views.
<body ng-app="starter">
  <ion-pane ng-controller="OverviewController as vm">
    <ion-header-bar class="bar-stable">
      <h1 class="title">🎂  Birthdays  🎉</h1>
      <div class="buttons">
        <button ng-click="vm.showAddBirthdayModal()" class="button button-icon icon ion-plus"></button>
      </div>
    </ion-header-bar>
    <ion-content>
      <ion-list>
        <ion-item ng-repeat="b in vm.birthdays" ng-click="vm.showEditBirthdayModal(b)">
          <div style="float: left">{{ b.Name }}</div>
          <div style="float: right">{{ b.Date | date:"dd MMMM yyyy" }}</div>
        </ion-item>
      </ion-list>
    </ion-content>
  </ion-pane>

  <script id="add-or-edit-birthday.html" type="text/ng-template">
    <ion-modal-view>
      <ion-header-bar>
        <h1 class="title">{{ action }} Birthday</h1>
        <div class="buttons">
        <button ng-hide="isAdd" ng-click="deleteBirthday()" class="button button-icon icon ion-trash-a"></button>
        </div>
      </ion-header-bar>
      <ion-content>
        <div class="list list-inset">
          <label class="item item-input">
          <input type="text" placeholder="Name" ng-model="birthday.Name">
          </label>
          <label class="item item-input">
          <input type="date" placeholder="Birthday" ng-model="birthday.Date">
          </label>
        </div>
        <div class="padding">
          <button ng-click="saveBirthday()" class="button button-block button-positive activated">Save</button>
        </div>
      </ion-content>
    </ion-modal-view>
  </script>
</body>
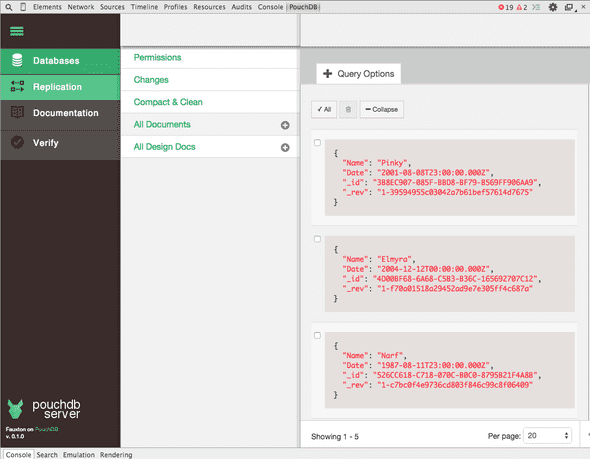
###Inspecting the database There is a Chrome extension called PouchDB Inspector that allows you to view the contents of the database in the Chrome Developer Tools.
You can not use the PouchDB Inspector if you loaded the app with
ionic serve --labbecause it usesiframesto display the iOS and the Androw views. The PouchDB Inspector needs to access PouchDB viawindow.PouchDBand it can't access that when thewindowis inside an<iframe>.
###Troubleshooting Keep in mind that when you're testing your Ionic app on a desktop browser it will use an IndexedDB or WebSQL adapter, depending on which browser you use. If you'd like to know which adapter is used by PouchDB, you can look it up:
var db = new PouchDB('birthdays');
console.log(db.adapter);
On a mobile device the adapter will be displayed as websql even if it is using SQLite, so to confirm that it is actually using SQLite you'll have to do this (see answer on StackOverflow):
var db = new PouchDB('birthdays');
db.info().then(console.log.bind(console));
This will output an object with a sqlite_plugin set to true or false.
###Delete database
var db = new PouchDB('birthdays');
db.destroy().then(function() { console.log('ALL YOUR BASE ARE BELONG TO US') });
You can also delete your database in the PouchDB Inspector, but for some reason it didn't work for me.
I hope this tutorial was helpful to you, leave a comment if you have any questions. For more information on PouchDB and NoSQL check out the references section below.
####References
Red Pill or Blue Pill? Choosing Between SQL & NoSQL
Introduction to PouchDB
Efficiently managing UI state with PouchDB
12 pro tips for better code with PouchDB

